Showing posts with label ANDROID. Show all posts

Both the Apple Watch and Android Wear provide plenty of value for certain wearers thanks to decent implementations of actionable notifications. But after a few weeks with the Apple Watch, it’s apparent that most apps haven’t quite figured out how to be useful on your wrist.
                
       For developers who didn’t have a Watch available before its release (that would be most of them), it was easy to assume that the best route to take was to shrink down their iPhone applications within the constraints of the WatchKit SDK — strip out some extraneous features, hide some stuff in a menu accessible via Force Touch, ship.
Workflow, an app originally built to let you automate frequent tasks on your iPhone or iPad, is one of the few apps available on the Apple Watch that seems built specifically for the smaller form factor.
On the phone Workflow lets users create a recipe of actions (take N number of pictures, piece them together into a GIF, send to X, Y, and Z recipients) and generate a home screen button or iOS action extension to perform that task with one tap at any time.
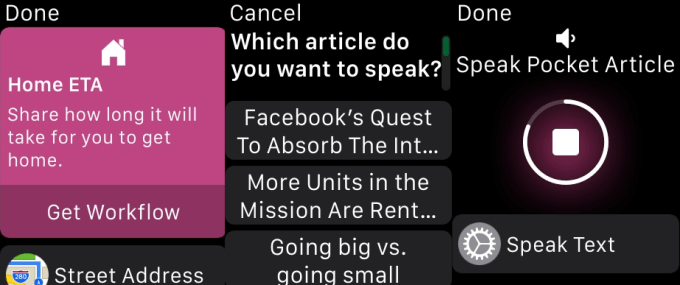


At $2.99 Workflow is a killer app for iPhone power users. But on the Watch, it’s an example of what apps across the board should look like on smart watches, Apple-made or otherwise.

Instead of providing an interface with options to pick from a menu or icons representing actions, Workflow on the Apple Watch has been stripped down to verbs. I want an Uber home, or to the next meeting in my calendar. I’m walking home and want to send an ETA to my roommates. Maybe I’m on BART and it’s just too tightly packed to read on my phone — no worries, I can pick a Pocket article to be read over the headphones plugged into the iPhone in my back pocket.

There are no gestures to remember or content to download to fill a feed. It’s the perfect application for the WatchKit app paradigm, with a single tap executing multiple instructions on the phone. And if, say, a destination or article needs to be picked, the pre-made workflows in the app’s gallery will serve up a few options that users are likely to choose.

Over the coming months, most developers will figure out that the best question to ask themselves when designing smart watch apps is, “What can I help users do with a single tap?” With cameras, LTE, GPS, screen size, and battery life keeping the smartphone relevant for the foreseeable future, developers should assume that users will always have a phone on them for any action that takes longer than raising your wrist, swiping once or twice, and tapping a button or two.

Workflow’s flaws demonstrate how apps will get better as Apple exposes native functions to third-party developers. Some workflows still require completing a step, like choosing the recipient of an automated text message, from the Messages app on the connected phone, which it gives a shortcut to via Handoff. Others have wonky behavior when activated from the Watch because Apple shuts off the Bluetooth radios to conserve power, temporarily pausing the article playing back. These and other tiny sources of frustration will go away as Apple opens up things like resource caching on the Watch (hopefully a few weeks from now at WWDC).


Android 5.1.1 Lollipop is official. This is a new minor update which still unaware of the changes incorporated. Google presents a new version to solve some problems and fix bugs that unfortunately are still among us.

Android 5.1 Lollipop was presented not long ago. In fact, there are still very few devices that can enjoy this OS version. For now, only users of the Nexus terminals. The fact is that at this point, is we are already talking about another brand new update that will make its way to these smartphones and tablets shortly. Android 5.1.1 Lollipop is a a small update that would bring some fixes and features to be determined yet. Anyway, in the last hours, we have learned new details about landing of this new version with a list of devices on which we can find the Nexus 9 and Nexus 7 2013 WiFi.


It is simple references, but the truth is that they could be indicators of great importance to know the actual status of the update and whether it will soon reach the main devices. The WiFi version of the Nexus 7, for example, is running with the number of LMY47W compilation, while the Nexus 9 makes it through LMY47S. We refer, of course, the code that has the Android version 5.1.1 Lollipop that is installed on these two teams. An important fact is that the two editions have fixed the build date on February 16, which could indicate that at this stage is nearly ready to be launched imminently. However, everything will be. What is clear, though, is that Google is already internally testing the operation of this update on both computers.

The most curious of all is that both tablets, both the Nexus 7 and the Nexus 9 are the only two devices that have not been updated to Android 5.1. It is true that Google has already posted factory images for both, but it is also true that at this point still paying through Android 5.0.1 Lollipop. The only ones that enjoy the latest official version of this platform are the Nexus 5, Nexus 4 and Nexus 7 2012.

The new version was seen in the Android SDK and now makes its official appearance in the Android AOSP repository. You know how it works, from now begin to have new factory images, new OTAs and the whole process that accompanies each new version of Android. A version that only users with a Nexus will enjoy in the coming weeks.


Peace of mind for the rest of users, since changes will be minimal. The rest of manufacturers have no need to provide the latest update soon so let’s not get carried away by the numbers and anxiety.

Currently Android 5.1.1 Lollipop will debut with the Nexus Player, the Android TV device. We already have the factory image, although the changes in this Nexus will not allow us to discover the various changes.

We will update the list as factory images and OTAs are available:


Factory Images

Nexus Player LMY47V
Nexus 5
Nexus 4
Nexus 9
Nexus 10
Nexus 7 2012
Nexus 7 2013


OTA

Nexus Player
Nexus 5
Nexus 4
Nexus 9
Nexus 10
Nexus 7 2012
Nexus 7 2013


The following factory image that should be available is that of the Nexus 9, since we do not even have an update to Android 5.1 Lollipop. Hopefully it will solve the problem with memory and finally have small changes in Android 5.1 on the Nexus. Keep you informed.

Here you can find an Android rooting method tested successfully with many Android devices, Root Genius, a one click rooting tool. It must be run from a Windows PC. The exploit used to root your Android phone or tablet can be detected as malware by some Antivirus software. That’s happens with many Rooting Tools.
Steps of the Root Genius method

Put your phone on USB Debugging mode (activate checkbox on Settings > Development options > USB debugging or Settings > Applications > Development > USB debugging). Development options can be hidden in your Android. If you want to show it you must go to Settings > About Phone > Built Number and tap on it 5-8 times.

Make sure the Android drivers for your phone or tablet are installed in your pc.

Root Genius Download and Open Root Genius App on your Windows PC.

Connect your Android device to your computer. Root Genius will detect your Android Device.
Click Root it button to ROOT your Android. Root Genius will automatically Root your Android phone or tablet and it will install the KingUser App. Once the process is finished your Android phone or tablet will be rooted successfully.

If you want to check if you are already root or superuser in your Android phone or tablet you can download HowToRoot app from Google Play Store and click over the padlock in the top-right of the screen. It will show you a message about if your device is rooted or not.

Download sources: DOWNLOAD ROOT GENIUS


Remember, you must root your device at your own risk.

Other important informations to read before rooting:

Warranty Void. If your root your Android device, the warranty may be void.

UNROOT your device. To unroot your Android phone or tablet, go to KingUser app on your device > Settings > Remove Root Permission.

Data lose. You can’t lose your data using this rooting method. Pictures, videos, audio files,… are not modified when you run Root Genius. It only makes some changes to let you enjoy superuser permissions in your device.


Steps of the rooting method Bin4ry


Download Root_with_Restore_by_ Bin4ry _vXX
Extract Root_with_Restore_by_ Bin4ry _vXX using 7zip,winzip,winrar,unzip,… or another decompressing application.
Put your phone on USB Debugging mode (activate checkbox on Settings>Development options>USB debugging or Settings>Applications>Development>USB debugging).
Only Windows users: Make sure Android drivers for your phone are installed in your PC. If not, you can find some drivers in this page.
Connect your smartphone to the PC.
Linux users only: You must run “chmod 755 ./RunMe.sh” and “chmod -R 755 ./stuff” command in a terminal.
Double click the RunMe.bat (Windows user) or run ./Runme.sh (Linux users) and follow instructions!
Select the correct mode.
Normally many users must run the option 1 (Normal mode)br
Xperia phones with “older” firmware = Normal modebr
Sony Tablet and similar = Special modebr
Xperia phones with JB Firmare = Mode 3 (Goroh_kun mode)br
If you want to check if you are already root or superuser in your Android phone or tablet you can download HowToRoot app from Google Play Store and click over the padlock in the top-right of the screen. It will show you a message about if your device is rooted or not. 

DOWNLOAD BIN4ry


Remember, you must root your device with Bin4ry at your own risk.
Other important informations read before rooting


Updated to v26 – Fixed Problem with last step of mode 3. (Now rm -rf of busybox is used instead android one which misses -f flag)

Normal Mode will not wipe any other data, don’t worry!

Special Mode CAN wipe your data, Rollback SHOULD restore, but to be sure backup you data somehow!

New Mode SHOULD be able to root all new Sony Firmwares like 2.55 and higher where Normal mode was failing.

Source BIN4ry METHOD

Legal conditions

TECHIEBRO is not responsible for any damages caused directly or indirectly by a rooting method. Any action for rooting your device is done only under your responsibility.

We recommend that you read all the instructions related to each root method and follow them step by step as indicated by the developers. If you have any question or need support, on every page there are links to the developers of each method.

Here you can find drivers, Android updates and step by step Android rooting guides available to root your Android phone or tablet. With these Android rooting guides you will be able to root your MICROMAX Funbook Infinity P275(P275) with Android version 4.0 Ice Cream

Each Android rooting guide is divided into several sections like Download sources, Rooting steps to follow , Useful links, Related links outside our web, etc … with these sections you can easily understand how to root your Android phone or tablet.

Available rooting guides fall into two possible categories:

ROOTING FROM A SMARTPHONE OR TABLET WITH APK FILES


This guide doesn’t need a computer and it can be run directly from your android device.
ROOTING FROM A PC

  • Your Android smartphone or tablet needs to be connected to a PC to be rooted.
  • Blue buttons below will let you to access different step-by-step ROOTING GUIDES AVAILABLE for your smartphone or tablet.
  • You have to take into account that many rooting guides (normally running an exploit via PC) may need the USB DRIVERS of your device INSTALLED in the computer.
  • GREEN BUTTONS will let you install generic drivers or will give you links to the official drivers sites. If generic drivers are not compatible with your Android smartphone or tablet you will have to visit the official website of the manufacturer of your device to download official drivers for your OS version (Windows or Linux).

Remember, you must root your Android smartphone or tablet at your own risk.

  AVAILABLE ROOTING GUIDES


ROOT FROM PC


IMPORTANT. READ BEFORE ROOTING
UNROOT


Before to make any OTA updates on your rooted device is recommended to make an UNROOT of it because some users have experienced problems after receiving OTA updates in their rooted devices.
LEGAL CONDITIONS

TECHIE BRO is not responsible for any damages caused directly or indirectly by a rooting guide. Any action for rooting your Android device must be done only under your responsibility.

We recommend that you read all instructions related to each rooting guide and follow step by step instructions as indicated by the developers. If you have questions or need support on every page there are links to the developers of each guide.

System Requirements

Windows

Microsoft® Windows® 8/7/Vista/2003 (32 or 64-bit)
2 GB RAM minimum, 4 GB RAM recommended
400 MB hard disk space
At least 1 GB for Android SDK, emulator system images, and caches
1280 x 800 minimum screen resolution
Java Development Kit (JDK) 7
Optional for accelerated emulator: Intel® processor with support for Intel® VT-x, Intel® EM64T (Intel® 64), and Execute Disable (XD) Bit functionality

Mac OS X

Mac® OS X® 10.8.5 or higher, up to 10.9 (Mavericks)
2 GB RAM minimum, 4 GB RAM recommended
400 MB hard disk space
At least 1 GB for Android SDK, emulator system images, and caches
1280 x 800 minimum screen resolution
Java Runtime Environment (JRE) 6
Java Development Kit (JDK) 7
Optional for accelerated emulator: Intel® processor with support for Intel® VT-x, Intel® EM64T (Intel® 64), and Execute Disable (XD) Bit functionality
On Mac OS, run Android Studio with Java Runtime Environment (JRE) 6 for optimized font rendering. You can then configure your project to use Java Development Kit (JDK) 6 or JDK 7.

Linux

GNOME or KDE desktop
GNU C Library (glibc) 2.15 or later
2 GB RAM minimum, 4 GB RAM recommended
400 MB hard disk space
At least 1 GB for Android SDK, emulator system images, and caches
1280 x 800 minimum screen resolution
Oracle® Java Development Kit (JDK) 7
Tested on Ubuntu® 14.04, Trusty Tahr (64-bit distribution capable of running 32-bit applications).


Powered by Blogger.